

Customizing the PeopleSoft signon page is common. Many organizations update the look to match their brand or style. Recently, I had to update the signon page for more than the look. We were upgrading two PeopleSoft systems and rebranding them into one enterprise application.
This was the situation:
- There are two PeopleSoft systems, HR and Finance.
- To the end users it is called one name and wanted the appearance of one system. Behind the scenes the two applications are on different servers.
- Interaction Hub wasn’t an option.
The solution we ended on was to use the same signon page for both systems. The signon page would let you log into either HR or Finance and look the same. These changes to the signon page need more javascript. We use a simple POST form action to the current URL.
We also updated the look of the signon page. This is what the page looks like after the changes.
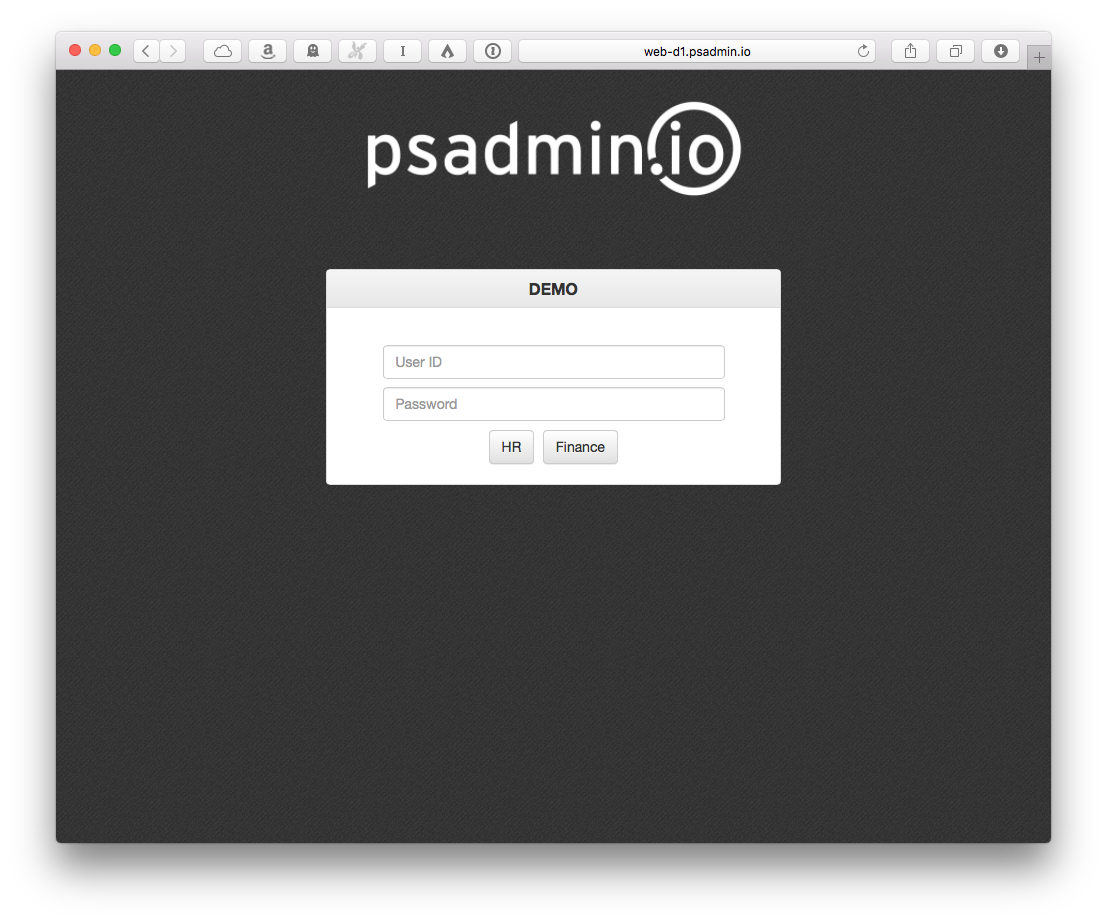


We used Bootstrap for the layout and styling and made the page simple. It resizes well for small screens, and the buttons and text boxes are bigger. The bigger controls are better for mobile users.
Two Targets
The first change was to add two buttons. One for HR and another for Finance. We modified the signon HTML table and changed the labels. But, you can’t have two submit buttons on a form where each button performs separate actions. We gave the “HR” button the submit type, and the Finance button was normal button.
The submit change had one important impact. When you hit the “Enter” key on a form, the button with a submit tag is selected. In our case, that meant users would log into HR if they hit the “Enter” key. Most of the users access HR, so we wanted that to be the default action. Of course, we had some Finance users who weren’t happy about the change 🙂
Because we had two targets, we couldn’t use the default behavior of the form. Some users might see the login page on the HR server, but want to log into Finance. We had to use the button selected to identify where the user was going and handle to form’s action in JavaScript.
Selecting the Target
We left the form’s target as ?&cmd=login, but to direct users to the appropriate environment we had to change the button’s action. We created a new JavaScript function, setLogin(URL). When a user clicks a button, we pass the URL for that environment to setLogin(). We used the onClick attribute on the button to make this happen. setLogin() will take the URL we pass in and set the form’s action. Then, the JavaScript submits the form.
Adjustable URLs
There is more to the setLogin() code though. If we pass in a default URL, users will always see the homepage (or whatever URL you pass to setLogin()). There are situations where you don’t want that to happen. If a user clicks on an approval link (I call this a deep link), you want the user to go to the approval page. In this situation we used some delivered JavaScript to handle deep links.
The setLogin() function uses this flow:
- Grab the current URL in the address bar.
- Use the delivered code to build a login URL from the address bar (if needed, for deep links).
- If the deep link URL is blank use the default URL from the button.
- If the deep link URL has a value, compare the deep link URL with the default URL to make sure domains match.
- If the URL domains are the same, use the deep link URL.
- If the URL domains are different, use the default URL. When in doubt, we will log the user into the system for the button they clicked. The biggest issue here is for Finance users. Because HR is the default button (the “Enter” key), users forget to click the “Finance” button and get logged into HR. Not the best situation, but we set up the page to be simple the largest number of end-users. We also don’t want to assume that the deep link URL, if it exists, is correct. Let’s say the user started typing the part of the domain name in the browser and it auto-completed a URL. The browser might auto-complete a deep-link URL from a past session to Finance, but the user was only trying to log in to HR.
Let’s look at the code. First up is the HTML for our new signon page – psadmin.html. We changed the name so that we don’t override the delivered signin.html file.
Here is our custom signon JavaScript code – psadmin.js. Again, we gave it a custom name so we don’t change the delivered code.
If you read the whole script, you may have caught the backdoor key handler to use during maintenance.
Configurable Text
We wanted to use the page in all the environments (DEV, TST, etc), but we didn’t want to customize the HTML for each environment. PeopleSoft has a text.properties file that let’s you add text to an HTML file. For the URLs and environment specific text, we added values to the text.properties file and our HTML is the same on each web server.
Included Files
As I mentioned earlier, we used Bootstrap for the layout and design. You can download the Bootstrap CSS and JavaScript files onto your web server, or use the hosted versions.
For IE, we had to add in some JavaScript to get the “User ID” and “Password” placeholder text to show up. That’s the Placeholders.min.js script.
I also used a custom font from the Google Font API. This can slow down your load time, but we found a font that matched the style of the system’s new brand.
For the background, I used the Debut Dark patter from Subtle Patterns. Put the image in `PORTAL.war/[domain]/images’
Installation
- Copy the
psadmin.htmlfile toPORTAL.war/WEB_INF/psftdocs/[domain]. - Add the custom text and URLs to the
text.propertiesfile inPORTAL.war/WEB_INF/psftdocs/[domain]. - Copy the
*.cssand*.jsfiles toPORTAL.war/[domain]. - In the Web Profile, under the Look and Feel tab, set
psadmin.htmlfor these pages:- Signon Page
- Signon Error Page
- Logout Page
- Save the Web Profile and restart the web server
Final Thoughts
While this scenario might not apply to many systems, I thought it would be fun to share. The entire project is hosted on GitHub. If you want to borrow any code, make improvements, or use it to start your own login page, please do so!